Saturday, November 1, 2014
Linux World: Creating read only proc entry in kernel versions a...
Linux World: Creating read only proc entry in kernel versions a...: The creation of proc entries has undergone a considerable change in kernel version 3.10 and above. In this post we will see one of the meth...
Linux World: Creating a read write proc entry in kernel version...
Linux World: Creating a read write proc entry in kernel version...: In the post Creating read only proc entry in kernel versions above 3.10 we saw how to create a read proc entry in the kernel version 3.10 ...
Thursday, October 23, 2014


10 Diagnostic Apps and Devices to Make You a Better Driver
10 Diagnostic Apps and Devices to Make You a Better Driver
Your car can tell you what it's up to under the hood—you just need the right tools to understand what it's saying. Hardwire yourself into the brains of your car with these 10 OBD-II apps and devices.
Since 1996, cars sold in the U.S. have been required to provide a connection for mechanics and inspectors to measure what's going on electronically under the hood. The system, called On-Board Diagnostics generation two (OBD-II), uses a 16-pin connector mounted somewhere near the instrument panel to gather information. If it detects faults, it transmits them in four-digit codes in four categories: P for powertrain, U for computer, C for chassis, and B for body.
That's great if you want to know why your Check Engine light is on. But how does this translate into having a little fun behind the wheel? Over the past half decade, there's been an explosion of aftermarket gadgets that allow the OBD-II connection to transmit useful stats, such as instant fuel economy, engine speed, temperature, and vehicle speed. Couple this valuable info with the accelerometers and GPS locating ability of common smartphones, and you can get a sophisticated view of your car's performance, efficency, and even your own driving prowess. Here are 10 of our favorite apps and devices for performance driving.
DevToaster's Rev
Price: $39.95 (requires additional OBD-II transmitter, about $150)
The coolest thing about the DevToaster Rev iPhone and OBD-II system, which won a Popular Mechanics Editor's Choice Award in 2009, is that it can tell you exactly how you're driving and how your car is behaving on a specific map. It will display how quickly or how efficiently you travel a challenging road by showing a graph of acceleration and braking forces, including lateral acceleration (g-forces). It's like having a driving instructor and vehicle performance measurement equipment along for every ride.
To start, you buy a wireless OBD-II data transmitter about the size of a matchbox and plug it into your car's OBD-II port. Then download the Rev application to your iPhone and you're ready. In addition to monitoring and graphing your performance behind the wheel, the Rev application also alerts you to problems and wear with your car, and a recently added feature allows you to reset your Check Engine warning light. Rev will also log your data so you can compare different trips in different cars, or check to see if the new intake or exhaust systems you just bolted on actually improves your performance.
PLX Kiwi Drive Green
Price: $199.95
The PLX Kiwi Drive Green is an efficiency driving coach that uses a stand-alone display and plugs into your car's OBD-II port using a cord. The device opens up a large menu of efficiency coaches, including a "Kiwi Score" game that tests your ability to get the best fuel economy possible. We gave the Kiwi Drive Green a Popular Mechanics Editors Choice Award back in 2008 for its forward-thinking approach. The Kiwi also measures fuel economy on separate trips, as well as how much fuel costs on each trip.
PLX Kiwi MPG
Price: $89.95
The PLX Kiwi MPG packs some of the same functions as the Kiwi Drive Green, but those mileage readings appear on much smaller digital display. It's a lot less expensive than the Drive Green, but you don't get the efficiency driving coach here. However, if your car didn't come with a trip computer or an instantaneous fuel-economy readout, then PLX Kiwi MPG will add those functions in a tiny unit that you can mount right on your instrument panel.
PLX Kiwi WiFi/Bluetooth
Price: $149.95/$99.95
These two OBD-II devices from PLX allow you to wirelessly connect to your car's computer with your iPhone, iPod Touch, or Android smartphone. The system lets you read engine and vehicle diagnostic codes through a free app. Like the DevToaster Rev, these devices let you track your car's performance over a particular course via GPS, and the faster connection of the iPhone WiFi model can even calculate lateral g-forces.
Car MD
Price: $70
The Car MD won't turn off your Check Engine light, but this easy-to-use gadget will find out which trouble code is making it illuminate and then take you to a website that explains the problem under the hood in plain English and suggests solutions specific to your vehicle. In addition, the software connects you to an online calculator that estimates the price of the repair. You can take the estimate to a repair shop to confirm the price.
GoPoint Technology GL1 Cable
Price: $99
This do-it-all OBD-II device won one of our Breakthrough Awards in 2010. The GoPoint connects with an iPhone or iPod Touch through a hardwired cable. (Some car enthusiasts prefer an old-school wired connection to eliminate possible interference or data-speed issues.) A similar app called BL1 uses a supplied Bluetooth transmitter for the same price. In addition to diagnosing faults and resetting the Check Engine light, the GoPoint GL1 provides a simple explanation to fault codes and displays real-time data on small graphics windows.
VoyagerDash
Price: $1.00 (also requires OBD-II Bluetooth adapter for Android phone, about $20 to $100)
The VoyagerDash is an Android app that, using a Bluetooth transmitter from the OBD-II port on your car, sends data to your smartphone. Then simply mount the phone on your car's dashboard and you can see either gauges that display your car's performance or bar graphs that show a record of performance over time. This application also lets you read trouble codes stored in the car's computer, though there is no function to reset the codes.
OBDroid
Price: $2.99 (requires an OBD-II Bluetooth transmitter, about $20 to $100)
The OBDroid, coupled with a Bluetooth connection to your car's OBD-II interface, is a fault-code reader that describes what the codes mean on an Android smartphone. It also displayd vehicle and engine speeds and intake airflow. And yes, it calculates fuel economy and resets Check Engine warning lights, too.
alOBD ScanGenPro
Price: $4.99 (requires an OBD-II Bluetooth transmitter, about $20 to $100)
This ungainly named app is preprogrammed with descriptions of error codes. The alOBD ScanGenPro displays real-time status of some sensor data in a digital format as well as a graph. It also stores and exports fault codes as well as specific vehicle parameters that are proprietary to some car manufacturers. And best of all, the alOBD can be customized for specific data captures.
Torque
Price: $4.95 (requires an OBD-II Bluetooth transmitter, about $20 to $100)
Torque. It's a very simple name for an app with quite a lot of capability. And it's been gaining popularity amongst car enthusiasts who own Android devices because it uses both Google Earth real-time car-performance displays and a calculated horsepower and torque measurement. Most important, it automatically records 0 to 60 mph sprints. Like diagnostic-only OBD-II devices, it also retrieves and resets fault codes, which is certainly helpful if you've modified your car.
Saturday, October 11, 2014
ZT: Creating an openflow enabled wireless router(D-Link DIR-615 E4)
http://kaarthek.wordpress.com/2014/02/03/creating-an-openflow-enabled-wireless-router-d-link-dir-615-e4-step-1/
Step 1: Installing OpenWRT via firmware reset in D-Link router OR restoring your D-Link router
Well this step actually took the longest time to implement :/
You see the router had no D-link firmware.The only option available was to upload a new firmware via the reset web interface.I initially thought that i would first reset my router by installing an official image(firmware) provided by D-Link.But to no avail.The router simply would not accept the D-Link images.
So i decided to directly upload the openwrt image from Openwrt.
And even this did not work immediately !! It seems that modern browsers dont work sometimes!!
I would recommend WAP users to use the openwrt firmware if their router firmware ever crashes(and your warranty’s expired).Its got a simple web interface (LUCI) thats very convenient to use and configuration is a piece of cake!
In this step i describe the method used to build the openwrt image with openflow package.The squashfs-sysupgrade images are present in the box widget.
I used instructions from both these links ( openwrt and Pantou) to build an image with following specifications.
1.Install the dependencies.
sudo apt-get install subversion build-essential libncurses5-dev zlib1g-dev gawk git ccache gettext libssl-dev xsltproc
2.Download Openwrt source and feeds
3.Get openwrt config file
IMPORTANT : DLINK as well as TPLINK uses ar71xx chipset.The config file for your router might vary.Download a different config if you are building for different hardware or a different version of OpenWRT.
Now edit the .config: set the CONFIG_SDK=n and CONFIG_MAKE_TOOLCHAIN=n to not build the SDK or the TOOLCHAIN.
4.Install the feeds
Create a Perl script at ~/openwrt/attitude_adjustment/config_install_feeds.pl:
Now run the script:
5.Disable unnecessary packages
Create the following script at ~/openwrt/attitude_adjustment/config_feeds_disable_packages.pl:
Run the script:
6.Configure OpenWRT
Here select the no. corresponding to your router.Answer n to all the queries.
7.Set up openflow package.
Select tplink branch for ar71xx devices.
8.Set up openflow package
9.Add the OpenFlow extensions to the Attitude Adjustment directory.
10.Add basic configuration files for OpenWRT
11.Configure build
12.You shall now see the following GUI (IMPORTANT)
The first build will take atleast a few hours.(Took 7-8 hours for me).To build an image for tp-link simply change the menuconfig file and select the correct target system.The second build will take much shorter time.
In this step, we upload the openwrt image we built.
If everything went fine the image will be present in ‘~/openwrt/attitude_adjustment/bin/ar71xx’ folder.
I strongly recommend installing the factory-squashfs version from official openwrt website.You could then configure your network settings.Also set your password and wifi security settings.So when you upload your image your network settings are preconfigured.Check the keep settings option as shown.
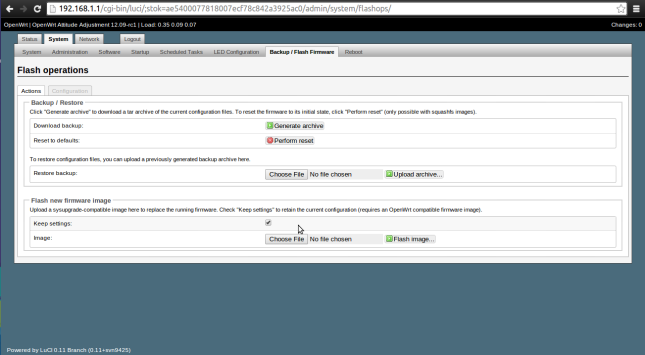
Here select ‘openwrt-ar71xx-generic-dir-615-e4-squashfs-sysupgrade.bin‘.
Once you upload this image you can access your router via ssh only.Open your command prompt and type
Enter the password you had set.You must now see the following screen.

Now install Luci by following the instructions given here.
This step describes the configuration required to get openflow up and running.
Primarily you need to edit 3 files to get openflow working.The files are..
(Note: These are files that worked for me.My router is a dhcp client connected to an ADSL modem.Your file configuration might vary)
The file for inband control is as shown.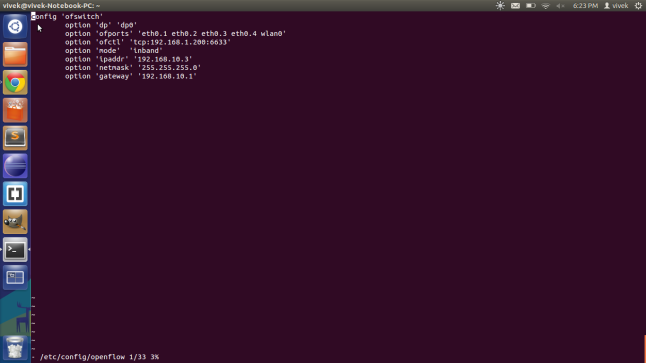
Start your floodlight controller via eclipse.
Here you must be able to view your switch if you have configured everything correctly.

Step 1: Installing OpenWRT via firmware reset in D-Link router OR restoring your D-Link router
Well this step actually took the longest time to implement :/
You see the router had no D-link firmware.The only option available was to upload a new firmware via the reset web interface.I initially thought that i would first reset my router by installing an official image(firmware) provided by D-Link.But to no avail.The router simply would not accept the D-Link images.
So i decided to directly upload the openwrt image from Openwrt.
And even this did not work immediately !! It seems that modern browsers dont work sometimes!!
- I had to disconnect my ubuntu lappy and connect the router to the windows PC.
- Next,I installed firefox portable on my windows PC.
- I uploaded the following image ‘openwrt-ar71xx-dir-615-c1-squashfs-factory.bin’ and this… finally got my dysfunctional router working :) !!
I would recommend WAP users to use the openwrt firmware if their router firmware ever crashes(and your warranty’s expired).Its got a simple web interface (LUCI) thats very convenient to use and configuration is a piece of cake!
In this step i describe the method used to build the openwrt image with openflow package.The squashfs-sysupgrade images are present in the box widget.
I used instructions from both these links ( openwrt and Pantou) to build an image with following specifications.
- Openflow version:1.0
- OpenWRT version: Attitude Adjustment
- OS used : Ubuntu 12.04
1.Install the dependencies.
sudo apt-get install subversion build-essential libncurses5-dev zlib1g-dev gawk git ccache gettext libssl-dev xsltproc
2.Download Openwrt source and feeds
 mkdir ~/openwrt

cd ~/openwrt

svn co -r 36088 svn://svn.openwrt.org/openwrt/branches/attitude_adjustment

cd attitude_adjustment

./scripts/feeds update -a
3.Get openwrt config file
 cd ~/openwrt/attitude_adjustment

rm .config

wget 'http://downloads.openwrt.org/attitude_adjustment/12.09-rc1/ar71xx/generic/config.ar71xx_generic'

ln -s config.ar71xx_generic .config
IMPORTANT : DLINK as well as TPLINK uses ar71xx chipset.The config file for your router might vary.Download a different config if you are building for different hardware or a different version of OpenWRT.
Now edit the .config: set the CONFIG_SDK=n and CONFIG_MAKE_TOOLCHAIN=n to not build the SDK or the TOOLCHAIN.
4.Install the feeds
Create a Perl script at ~/openwrt/attitude_adjustment/config_install_feeds.pl:
#!/usr/bin/perl

use warnings;

use strict;

open(CONFIG_FILE, '<', ".config");

while(<CONFIG_FILE>)

{

if( $_ =~ /^CONFIG_PACKAGE_(.+?)=y/)

{

my $feed = $1;

print("./scripts/feeds install $feed\n");

system("./scripts/feeds install $feed");

}

}
Now run the script:
 cd ~/openwrt/attitude_adjustment

chmod 755 config_install_feeds.pl

./config_install_feeds.pl
5.Disable unnecessary packages
Create the following script at ~/openwrt/attitude_adjustment/config_feeds_disable_packages.pl:
#

!/usr/bin/perl

use warnings;

use strict;

open(CONFIG_FILE, '<', ".config");

while(<CONFIG_FILE>)

{

chomp;

if( $_ =~ /^CONFIG_PACKAGE_(.+?)=m$/)

{

print("CONFIG_PACKAGE_$1=n\n");

}

else

{

print("$_\n");

}

}
Run the script:
cd ~/openwrt/attitude_adjustment

chmod 755 config_feeds_disable_packages.pl

./config_feeds_disable_packages.pl > ./.config.new

mv ./.config.new ./.config
6.Configure OpenWRT
make oldconfigHere select the no. corresponding to your router.Answer n to all the queries.
7.Set up openflow package.
Select tplink branch for ar71xx devices.
cd ~/openwrt/

git clone git://gitosis.stanford.edu/openflow-openwrt
8.Set up openflow package
 cd openflow-openwrt

git checkout -b openflow-1.0/tplink origin/openflow-1.0/tplink
9.Add the OpenFlow extensions to the Attitude Adjustment directory.
cd ~/openwrt/attitude_adjustment/package/

ln -s ~/openwrt/openflow-openwrt/openflow-1.0/
10.Add basic configuration files for OpenWRT
cd ~/openwrt/attitude_adjustment/

ln -s ~/openwrt/openflow-openwrt/openflow-1.0/files
11.Configure build
cd ~/openwrt/attitude_adjustment

make menuconfig
12.You shall now see the following GUI (IMPORTANT)
- Select your platform for Target System (Atheros AR71xx)
- Select your platform at Target Profile (i.e. D-Link-DIR-615)
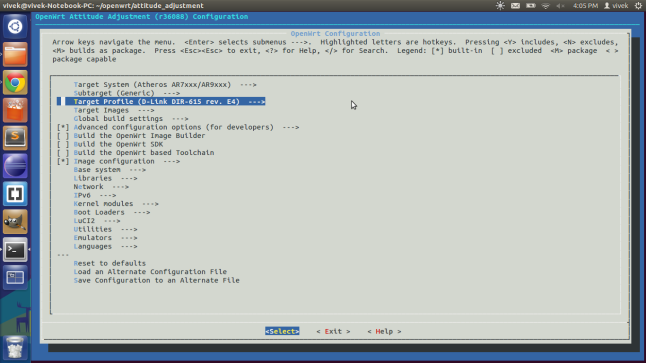
- Select OpenFlow package under network
- Select tc package under network
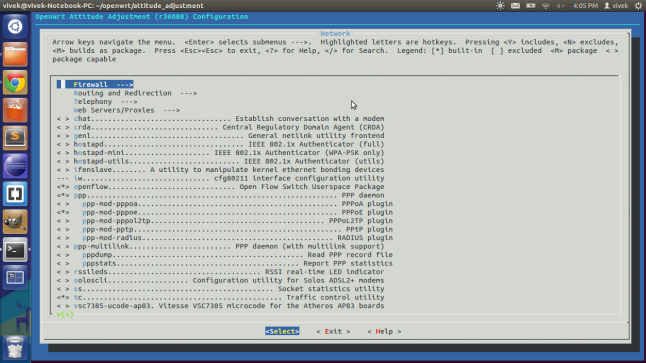
- Select kmod-tun under Kernel Modules->Network Support
- Save and Exit


make kernel_menuconfig- Under Networking Support->Networking options->QoS and/or fair queueing select Hierarchical Token Bucket (HTB)
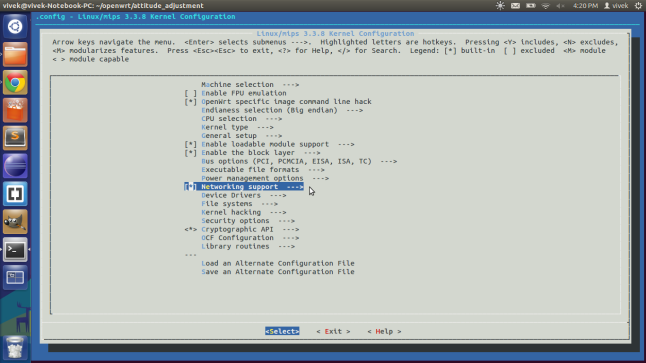
- Save and Exit

cd attitude_adjustment

make V=s
The first build will take atleast a few hours.(Took 7-8 hours for me).To build an image for tp-link simply change the menuconfig file and select the correct target system.The second build will take much shorter time.
In this step, we upload the openwrt image we built.
If everything went fine the image will be present in ‘~/openwrt/attitude_adjustment/bin/ar71xx’ folder.
I strongly recommend installing the factory-squashfs version from official openwrt website.You could then configure your network settings.Also set your password and wifi security settings.So when you upload your image your network settings are preconfigured.Check the keep settings option as shown.

Here select ‘openwrt-ar71xx-generic-dir-615-e4-squashfs-sysupgrade.bin‘.
Once you upload this image you can access your router via ssh only.Open your command prompt and type
sudo ssh 192.168.1.1Enter the password you had set.You must now see the following screen.
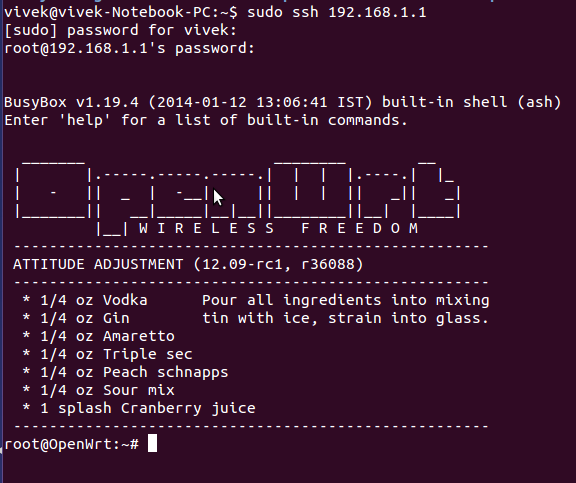
Now install Luci by following the instructions given here.
This step describes the configuration required to get openflow up and running.
Primarily you need to edit 3 files to get openflow working.The files are..
(Note: These are files that worked for me.My router is a dhcp client connected to an ADSL modem.Your file configuration might vary)
- /etc/config/network


- /etc/config/wireless
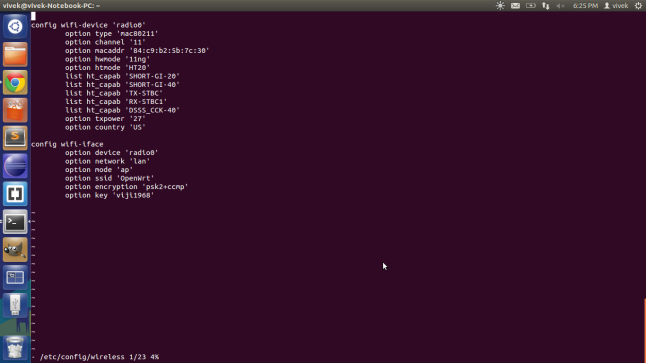
- /etc/config/openflow

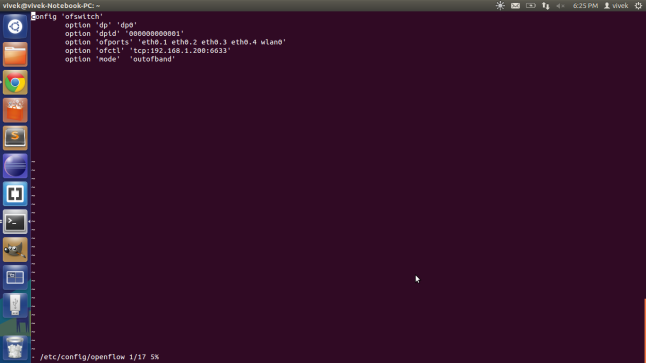
The file for outband control.

- ofctl – address of my machine(LAN side).6633 is the default port of my floodlight controller.
- ipaddr – address of my router (WAN side)
- gateway- address of my modem.
/etc/init.d/network restart

 /etc/init.d/openflow restart
Start your floodlight controller via eclipse.
Here you must be able to view your switch if you have configured everything correctly.

ZT: OpenWRT c,c++ programing
http://fleshandmachines.wordpress.com/2011/08/22/openwrt-cc-programing/
First we need a developer platform or an SDK. I used my PC with Ubuntu for that.
Second we have to download the SDK that’s suit for us. What kind of SDK we need? It depends on the hardware that we use for running the OpenWRT. I have two OpenWRT compatible router the first is a Linksys WRT54GL, second is a WRT160NL. They have different architecture but that’s not a big problem.
The WRT54GL have Broadcom BCM5352, so I use brcm-2.4 .
The WRT160NL have a Atheros AR9130 rev 2, so I use ar71xx for that one.
Th latest OpenWRT release (when I write this post) is /backfire/10.03.1-rc5 . If I want my SDK for WRT54GL here can be found: http://downloads.openwrt.org/backfire/10.03.1-rc5/brcm-2.4/OpenWrt-SDK-brcm-2.4-for-Linux-i686-gcc-3.4.6_uClibc-0.9.30.1.tar.bz2
and for WRT160NL http://downloads.openwrt.org/backfire/10.03.1-rc5/ar71xx/OpenWrt-SDK-ar71xx-for-Linux-i686-gcc-4.3.3+cs_uClibc-0.9.30.1.tar.bz2. Now we have to download the one that’s fit for our project. After that we unpack the tar. We are done for this part, let’s do the coding.
C version:
Here is what look like an ordinary c code:
/****************
* Helloworld.c
* A test code.
*****************/
#include \

int main(void)
{
 printf("Hello world!");
 return 0;
}
# build helloworld executable when user executes "make"
helloworld: helloworld.o
 $(CC) $(LDFLAGS) helloworld.o -o helloworld
helloworld.o: helloworld.c
 $(CC) $(CFLAGS) -c helloworld.c

# remove object files and executable when user executes "make clean"
clean:
 rm *.o helloworld
##############################################
# OpenWrt Makefile for helloworld program
#
#
# Most of the variables used here are defined in
# the include directives below. We just need to
# specify a basic description of the package,
# where to build our program, where to find
# the source files, and where to install the
# compiled program on the router.
#
# Be very careful of spacing in this file.
# Indents should be tabs, not spaces, and
# there should be no trailing whitespace in
# lines that are not commented.
#
##############################################

include $(TOPDIR)/rules.mk

# Name and release number of this package
PKG_NAME:=helloworld
PKG_RELEASE:=1


# This specifies the directory where we're going to build the program.
# The root build directory, $(BUILD_DIR), is by default the build_mipsel
# directory in your OpenWrt SDK directory
#PKG_BUILD_DIR := $(BUILD_DIR)/$(PKG_NAME)


include $(INCLUDE_DIR)/package.mk


# Specify package information for this program.
# The variables defined here should be self explanatory.
# If you are running Kamikaze, delete the DESCRIPTION
# variable below and uncomment the Kamikaze define
# directive for the description below
define Package/helloworld
   SECTION:=utils
   CATEGORY:=Utilities
   TITLE:=Helloworld -- prints a snarky message
endef

define Package/helloworld/description
 It is a helloworld.
endef

# Uncomment portion below for Kamikaze and delete DESCRIPTION variable above
#define Package/helloworld/description
#endef


# Specify what needs to be done to prepare for building the package.
# In our case, we need to copy the source files to the build directory.
# This is NOT the default.  The default uses the PKG_SOURCE_URL and the
# PKG_SOURCE which is not defined here to download the source from the web.
# In order to just build a simple program that we have just written, it is
# much easier to do it this way.
define Build/Prepare
 mkdir -p $(PKG_BUILD_DIR)
 $(CP) ./src/* $(PKG_BUILD_DIR)/
endef


# We do not need to define Build/Configure or Build/Compile directives
# The defaults are appropriate for compiling a simple program such as this one


# Specify where and how to install the program. Since we only have one file,
# the helloworld executable, install it by copying it to the /bin directory on
# the router. The $(1) variable represents the root directory on the router running
# OpenWrt. The $(INSTALL_DIR) variable contains a command to prepare the install
# directory if it does not already exist.  Likewise $(INSTALL_BIN) contains the
# command to copy the binary file from its current location (in our case the build
# directory) to the install directory.
define Package/helloworld/install
 $(INSTALL_DIR) $(1)/bin
 $(INSTALL_BIN) $(PKG_BUILD_DIR)/helloworld $(1)/bin/
endef


# This line executes the necessary commands to compile our program.
# The above define directives specify all the information needed, but this
# line calls BuildPackage which in turn actually uses this information to
# build a package.
$(eval $(call BuildPackage,helloworld))
Now we have to copy the helloworld folder to the sdk, in the package subfolder. Then use the make command in the SDK folder. If there are problems, we have use the make V=99 command, it will show where might we find the source of the bug. If there wasn’t any problem we can find the binary package at the SDK/bin/packages/mipsel. Now copy the package to the openwrt. For linux you might use: scp helloworld_1_mipsel.ipk root@192.168.1.100: For windows you can use WinScp. If you uploaded the file, you have to ssh to the OpenWRT or the router and use this command
opkg intall helloworld_1_mipsel.ipk . More about OPKG. Only one thing is left, to run the file, we have use helloworld command. If everything was ok, then we see this at console: Hello world! And the C++ version
The C++ version has just a little difference. You have to write a c++ code. Here is what I preprared:
Helloworldcxx.cpp:
/****************
* Helloworldcxx.cpp
*****************/
#include ;

using namespace std;

int main()
{
        cout << "Hello world!\n\n";
 return 0;
}
# build helloworldcxx executable when user executes "make"
helloworldcxx: helloworldcxx.o
 $(CXX) $(LDFLAGS) helloworldcxx.o -o helloworldcxx
helloworldcxx.o: helloworldcxx.cpp
 $(CXX) $(CXXFLAGS) -c helloworldcxx.cpp

# remove object files and executable when user executes "make clean"
clean:
 rm *.o helloworldcxx
Makefile:
##############################################
# OpenWrt Makefile for helloworldcxx program
#
#
# Most of the variables used here are defined in
# the include directives below. We just need to
# specify a basic description of the package,
# where to build our program, where to find
# the source files, and where to install the
# compiled program on the router.
#
# Be very careful of spacing in this file.
# Indents should be tabs, not spaces, and
# there should be no trailing whitespace in
# lines that are not commented.
#
##############################################

include $(TOPDIR)/rules.mk

# Name and release number of this package
PKG_NAME:=helloworldcxx
PKG_RELEASE:=1


# This specifies the directory where we're going to build the program.
# The root build directory, $(BUILD_DIR), is by default the build_mipsel
# directory in your OpenWrt SDK directory
#PKG_BUILD_DIR := $(BUILD_DIR)/$(PKG_NAME)


include $(INCLUDE_DIR)/package.mk


# Specify package information for this program.
# The variables defined here should be self explanatory.
# If you are running Kamikaze, delete the DESCRIPTION
# variable below and uncomment the Kamikaze define
# directive for the description below
define Package/helloworldcxx
   SECTION:=utils
   CATEGORY:=Utilities
   TITLE:=helloworldcxx -- prints a snarky message
endef

define Package/helloworldcxx/description
 It is a helloworldcxx.
endef


# Specify what needs to be done to prepare for building the package.
# In our case, we need to copy the source files to the build directory.
# This is NOT the default.  The default uses the PKG_SOURCE_URL and the
# PKG_SOURCE which is not defined here to download the source from the web.
# In order to just build a simple program that we have just written, it is
# much easier to do it this way.
define Build/Prepare
 mkdir -p $(PKG_BUILD_DIR)
 $(CP) ./src/* $(PKG_BUILD_DIR)/
endef


# We do not need to define Build/Configure or Build/Compile directives
# The defaults are appropriate for compiling a simple program such as this one


# Specify where and how to install the program. Since we only have one file,
# the helloworldcxx executable, install it by copying it to the /bin directory on
# the router. The $(1) variable represents the root directory on the router running
# OpenWrt. The $(INSTALL_DIR) variable contains a command to prepare the install
# directory if it does not already exist.  Likewise $(INSTALL_BIN) contains the
# command to copy the binary file from its current location (in our case the build
# directory) to the install directory.
define Package/helloworldcxx/install
 $(INSTALL_DIR) $(1)/bin
 $(INSTALL_BIN) $(PKG_BUILD_DIR)/helloworldcxx $(1)/bin/
endef


# This line executes the necessary commands to compile our program.
# The above define directives specify all the information needed, but this
# line calls BuildPackage which in turn actually uses this information to
# build a package.
$(eval $(call BuildPackage,helloworldcxx))
There is only thing left to run the package, we have to install the libstdcpp package. This package is big, this is why it’s not standard installed. If you lack of storage space, you might use just c code. There are plenty of ways to have plus storage on the router, it’s depending on the resources what we have. For example you can use a pendrive if you have a router with USB port. Or you can use flashdrive, but you have to create the interface for that, there are many good tutorials how to do that. So if you have confidence in your self you can create a flashdrive port.
The good part is in creating a program in OpenWRT is if you have written good code, and you want to use it on a different architechture, all you have to do is to download it’s SDK, and compile the code with that.
Here is the tutorial that’s what I used for the first time to write code and to write my tutorial. Thanks the Gargoyle guys for their tutorial, it helped me a lot :].
Subscribe to:
Posts (Atom)