Step 1: Installing OpenWRT via firmware reset in D-Link router OR restoring your D-Link router
Well this step actually took the longest time to implement :/
You see the router had no D-link firmware.The only option available was to upload a new firmware via the reset web interface.I initially thought that i would first reset my router by installing an official image(firmware) provided by D-Link.But to no avail.The router simply would not accept the D-Link images.
So i decided to directly upload the openwrt image from Openwrt.
And even this did not work immediately !! It seems that modern browsers dont work sometimes!!
- I had to disconnect my ubuntu lappy and connect the router to the windows PC.
- Next,I installed firefox portable on my windows PC.
- I uploaded the following image ‘openwrt-ar71xx-dir-615-c1-squashfs-factory.bin’ and this… finally got my dysfunctional router working :) !!
I would recommend WAP users to use the openwrt firmware if their router firmware ever crashes(and your warranty’s expired).Its got a simple web interface (LUCI) thats very convenient to use and configuration is a piece of cake!
In this step i describe the method used to build the openwrt image with openflow package.The squashfs-sysupgrade images are present in the box widget.
I used instructions from both these links ( openwrt and Pantou) to build an image with following specifications.
- Openflow version:1.0
- OpenWRT version: Attitude Adjustment
- OS used : Ubuntu 12.04
1.Install the dependencies.
sudo apt-get install subversion build-essential libncurses5-dev zlib1g-dev gawk git ccache gettext libssl-dev xsltproc
2.Download Openwrt source and feeds
 mkdir ~/openwrt

cd ~/openwrt

svn co -r 36088 svn://svn.openwrt.org/openwrt/branches/attitude_adjustment

cd attitude_adjustment

./scripts/feeds update -a
3.Get openwrt config file
 cd ~/openwrt/attitude_adjustment

rm .config

wget 'http://downloads.openwrt.org/attitude_adjustment/12.09-rc1/ar71xx/generic/config.ar71xx_generic'

ln -s config.ar71xx_generic .config
IMPORTANT : DLINK as well as TPLINK uses ar71xx chipset.The config file for your router might vary.Download a different config if you are building for different hardware or a different version of OpenWRT.
Now edit the .config: set the CONFIG_SDK=n and CONFIG_MAKE_TOOLCHAIN=n to not build the SDK or the TOOLCHAIN.
4.Install the feeds
Create a Perl script at ~/openwrt/attitude_adjustment/config_install_feeds.pl:
#!/usr/bin/perl

use warnings;

use strict;

open(CONFIG_FILE, '<', ".config");

while(<CONFIG_FILE>)

{

if( $_ =~ /^CONFIG_PACKAGE_(.+?)=y/)

{

my $feed = $1;

print("./scripts/feeds install $feed\n");

system("./scripts/feeds install $feed");

}

}
Now run the script:
 cd ~/openwrt/attitude_adjustment

chmod 755 config_install_feeds.pl

./config_install_feeds.pl
5.Disable unnecessary packages
Create the following script at ~/openwrt/attitude_adjustment/config_feeds_disable_packages.pl:
#

!/usr/bin/perl

use warnings;

use strict;

open(CONFIG_FILE, '<', ".config");

while(<CONFIG_FILE>)

{

chomp;

if( $_ =~ /^CONFIG_PACKAGE_(.+?)=m$/)

{

print("CONFIG_PACKAGE_$1=n\n");

}

else

{

print("$_\n");

}

}
Run the script:
cd ~/openwrt/attitude_adjustment

chmod 755 config_feeds_disable_packages.pl

./config_feeds_disable_packages.pl > ./.config.new

mv ./.config.new ./.config
6.Configure OpenWRT
make oldconfigHere select the no. corresponding to your router.Answer n to all the queries.
7.Set up openflow package.
Select tplink branch for ar71xx devices.
cd ~/openwrt/

git clone git://gitosis.stanford.edu/openflow-openwrt
8.Set up openflow package
 cd openflow-openwrt

git checkout -b openflow-1.0/tplink origin/openflow-1.0/tplink
9.Add the OpenFlow extensions to the Attitude Adjustment directory.
cd ~/openwrt/attitude_adjustment/package/

ln -s ~/openwrt/openflow-openwrt/openflow-1.0/
10.Add basic configuration files for OpenWRT
cd ~/openwrt/attitude_adjustment/

ln -s ~/openwrt/openflow-openwrt/openflow-1.0/files
11.Configure build
cd ~/openwrt/attitude_adjustment

make menuconfig
12.You shall now see the following GUI (IMPORTANT)
- Select your platform for Target System (Atheros AR71xx)
- Select your platform at Target Profile (i.e. D-Link-DIR-615)
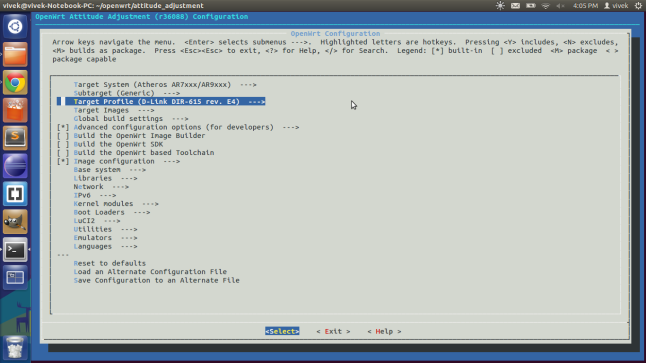
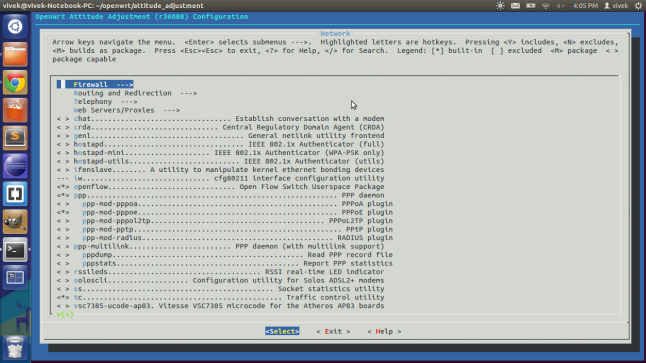
- Select OpenFlow package under network
- Select tc package under network
- Select kmod-tun under Kernel Modules->Network Support
- Save and Exit


make kernel_menuconfig- Under Networking Support->Networking options->QoS and/or fair queueing select Hierarchical Token Bucket (HTB)
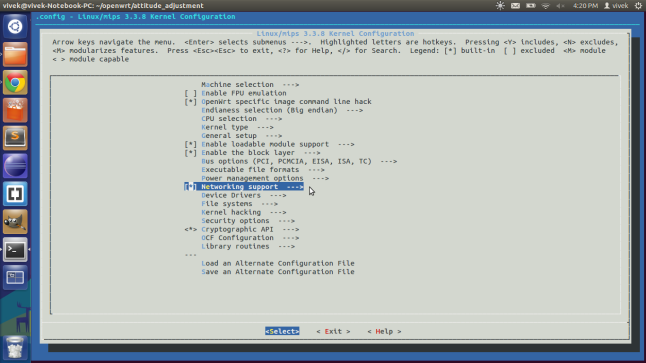
- Save and Exit

cd attitude_adjustment

make V=s
The first build will take atleast a few hours.(Took 7-8 hours for me).To build an image for tp-link simply change the menuconfig file and select the correct target system.The second build will take much shorter time.
In this step, we upload the openwrt image we built.
If everything went fine the image will be present in ‘~/openwrt/attitude_adjustment/bin/ar71xx’ folder.
I strongly recommend installing the factory-squashfs version from official openwrt website.You could then configure your network settings.Also set your password and wifi security settings.So when you upload your image your network settings are preconfigured.Check the keep settings option as shown.

Here select ‘openwrt-ar71xx-generic-dir-615-e4-squashfs-sysupgrade.bin‘.
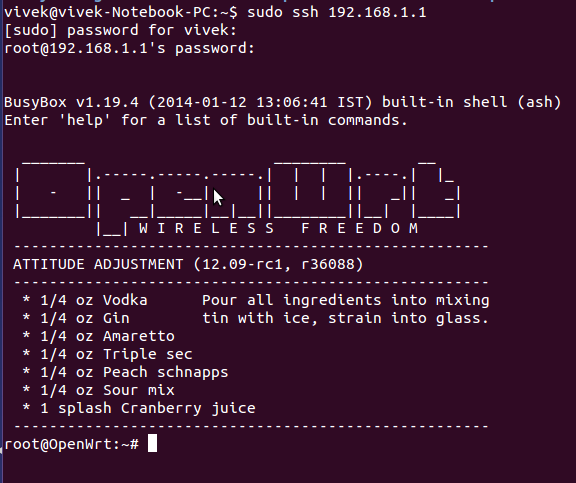
Once you upload this image you can access your router via ssh only.Open your command prompt and type
sudo ssh 192.168.1.1Enter the password you had set.You must now see the following screen.
Now install Luci by following the instructions given here.
This step describes the configuration required to get openflow up and running.
Primarily you need to edit 3 files to get openflow working.The files are..
(Note: These are files that worked for me.My router is a dhcp client connected to an ADSL modem.Your file configuration might vary)
- /etc/config/network


- /etc/config/wireless
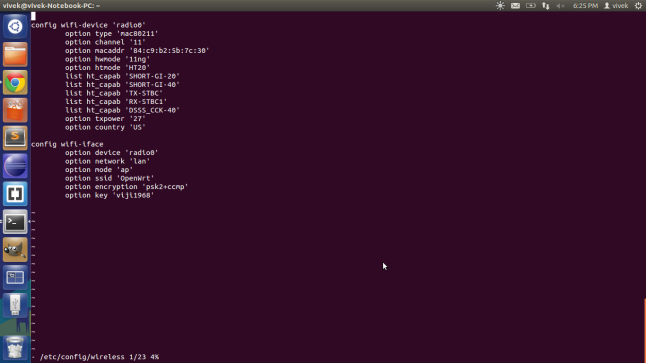
- /etc/config/openflow

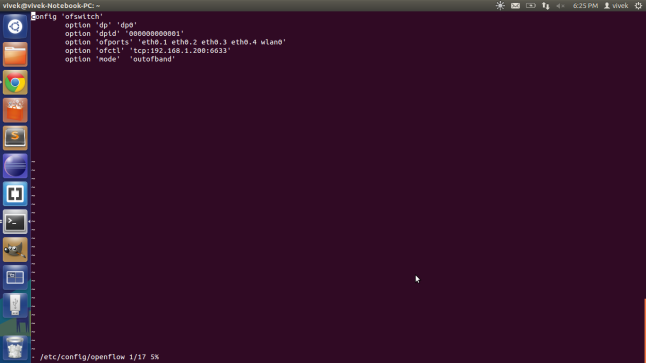
The file for outband control.

- ofctl – address of my machine(LAN side).6633 is the default port of my floodlight controller.
- ipaddr – address of my router (WAN side)
- gateway- address of my modem.
/etc/init.d/network restart

 /etc/init.d/openflow restart
Start your floodlight controller via eclipse.
Here you must be able to view your switch if you have configured everything correctly.

Looking for D-link Support call on 1800987893 , visit on:
ReplyDeleted link router page
dlink support contact number